#Hacktoberfest 2019: the PR that almost didn’t happen

(Or: How I Learned to Stop WSLing and Love the VM)


In an earlier Hacktoberfest post, I noted how new open source contributors typically find it more challenging to configure the development environment necessary to work on an open source project than to actually resolve an issue that project has (especially in the absence of beginner-friendly documentation).

In my last Hacktoberfest post, I stated that my next pull request would be to Comcast‘s Go-based RestfulHttpsProxy project—and it was! I am proud to say that I managed to tackle an issue that I found quite intimidating and challenging throughout the time I spent working on it.

Issue RestfulHttpsProxy#5: implement command line arguments

On the surface, a fix for this issue appeared simple: I was very much accustomed implementing command line arguments (e.g. in C++).

However, my task was complicated by several factors:

  1. The project is written in Go, a language with which I had no prior experience.
  2. Because the project is built and run via the make command, command line arguments must be sent to the makefile—and possibly passed back-and-forth between the makefile and dockerfile—from which they are received by the project’s main function.
    • Although I used make when working on Layer5.io, I had no prior experience actually writing makefiles (or dockerfiles).
    • I also had no prior experience building and running Docker containers (which was evidently needed to fully test my changes).
  3. The project is quite highly-technical, dealing with proxy rewrite rules. I still cannot pretend to fully understand its scope or purpose.
  4. The project also appears to be quite new and is relatively small: apart from the sole repository manager, I appear to be (at the time of writing) the only outside (non-Comcast) contributor!
    • Unfortunately, this meant that I had no highly-responsive community that I could fall back on for support, like I had when working on Layer5.

I prefer to code on my laptop. Although it runs Windows 10 Home Edition, I had yet to encounter any issues setting up any Linux-based development environment through the use of Windows Subsystem for Linux (WSL) Ubuntu… until this project.

I had heard great things about Docker, and when I realized that I would have to set it up to test my work, I was eager to get it running on my machine. Unfortunately, it was not easy.

I learned quickly learned that Docker for Windows is not compatible with Windows 10 Home Edition.

Sure, no problem: I could just run Docker Engine for Ubuntu via WSL, right?

Well, I discovered that that is not possible, either. (WSL2 may be able to do so, but is only available to ‘Windows Insiders’.)


I realized that at this point, my only option would be to run Docker from within a Linux virtual machine. However, I found myself too stubborn to let go of including my beloved WSL in my development environment (I was perhaps annoyed about needing to virtualize Linux when I was already using WSL). This stubbornness ended up costing me a lot of wasted time.

I found two great blog posts detailing how to connect WSL to a remote Docker daemon running on either Docker for Windows or a Linux virtual machine. I followed the advice in the posts, Unfortunately, I was ultimately not successful in doing so. The good news is that I didn’t actually need to do this: I only had to install Docker Engine in the virtual machine. After doing so, I was able to move on to actually work on the issue!

(Unfortunately, I found myself unable to copy and paste from my host OS to my Ubuntu Server guest. I typed my development environment into existence and resolved this issue keystroke by keystroke… I now virtualize Ubuntu Desktop instead.)


After wading through a fair bit of documentation on Golang, make and Docker, I learned how to pass command line variables to, from and between makefiles and dockerfiles, to ultimately be captured into the main Go function.

My task necessitated that I learn some interesting things about dockerfiles, such as the difference between a dockerfile’s build-time variables (ARG) versus its environment variables (ENV):

A diagram that I found helpful
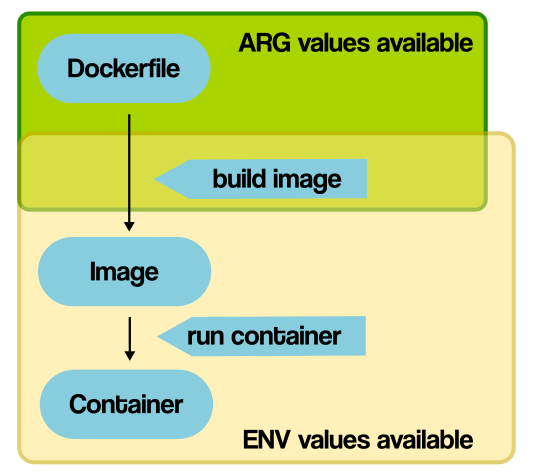
Source: vsupalov.com

Ultimately, I was able to implement command line argument passing for each of the possible use cases (i.e. makefile targets). More importantly, I was able to test my work by building and running the project both within and without a Docker container. After accomplishing this, I opened a pull request:

Pull request RestfulHttpsProxy#11: resolves issue RestfulHttpsProxy#5

By tackling this issue, I believe that I have met my stated goal of challenging myself during this Hacktoberfest.

However, the challenge does not end here: the fourth and final issue I plan to tackle this Hacktoberfest will not only be quite challenging, but will also seek to meet my final goal of contributing to a “close-to-home” project.

#Hacktoberfest 2019 is heating up!

(ICYMI: I’ve made my first-ever Hacktoberfest contribution!)

Hacktoberfest 2019 is now well underway, and I am happy to report that I have made my second contribution to my new favorite open source community, Layer5 (on GitHub)!

Before I continue on, I want to extend a huge thank-you to Layer5’s lead developer, Lee Calcote, as well as the Layer5 community managers for welcoming me into the Layer5 Slack channel, allowing me to introduce myself in their weekly community meeting, and even giving my blog an awesome shout out on Twitter!


This week, I helped resolve the very first issue that I outlined in my Planning for #Hacktoberfest 2019 post:

Issue layerio#65: enhancements for the Layer5 Landscape page

At the time I found this issue, the second requested enhancement (concerning table row coloration) was already handled by another contributor, leaving me with two tasks:

  1. Implementing the specified sorting functionalities (for the three tables on the Landscape page)
  2. Restyling the font color of site hyperlinks (an enhancement requested later on in the issue)

The strange case of Jekyll

Fortunately, thanks to my previous work with Layer5’s website, I was already all set up with an offline development environment. However, going into my first task, I knew very little about Jekyll except how to install it.

Jekyll and Liquid… it’s got to be like React or Angular, right? I mean, all I need to do is slap in sort and reverse filters and toggle them onclick, right…?

…Wait, what’s a “static site generator”?


After discovering what Jekyll and Liquid actually were, I determined that I would have to resort to DOM manipulation to fully accomplish my first task. However, I did succeed in accomplishing the default sorting behaviour by enhancing the Liquid tags being used by several tables.

To do so, I followed coding style on the issue’s previous contributor by encapsulating my work within a new JavaScript file in the project’s assets folder: a simple bubble sort function.

I chose to implement the simplest of sorting algorithms in JavaScript (which I count as study for my Data Structures and Algorithms midterm):

// Excerpted from https://github.com/layer5io/layer5/blob/master/assets/js/table-sort.js
let bubbleSort = () => {
  for (i = 0; i < rows.length-1; i++) {
    for (j = 0; j < rows.length-i-1; j++) {
      if (shouldSwap(text(j), text(j+1))) {
        rows[j].parentNode.insertBefore(rows[j+1], rows[j]);
        didSort = true;
      }
    }
  }
};

Painting over Pumpkin Bread

Encycolorpedia.com lists the hex color code #fdac40 as “Valspar Paint Pumpkin Bread“. Although Layer5.io’s then-difficult-to-read hyperlinks were colored #ffab40, I’d still like to think that the second task of my second Hacktoberfest contribution was festively-themed!

In my last blog post, I mentioned that Materialize CSS was worth further research. Well, after some poking around, I discovered that all of Layer5.io’s pumpkin-colored hyperlink styling (both deliberate, and incidental) originated from its materialize.css asset.

Although this asset has been frequently modified, I was still hesitant to globally alter the site’s styling (in case a return to Pumpkin Bread was desired in the future), so I instead opted to add a new inline style tag to override a styling rule (on top of removing the ‘orange-text’ class from individual anchor elements).


All of the changes I’ve made can be viewed through my (merged) pull request:

Pull request layer5io#209: resolved the remainder of issue layerio#65

#Hacktoberfest goals: how am I doing?

Within my Planning for #Hacktoberfest 2019 post, I stated two goals: to progressively challenge, and to work on a “close-to-home” project.

This week’s contribution is definitely a step up in programmatic complexity from last week’s, and I plan to continue keep things interesting so by contributing to Comcast‘s Go-based RestfulHttpsProxy project during this upcoming week, and taking over work on a CSS-to-Sass refactoring for a very close-to-home project for the final stretch!

I am very fortunate to be so well-supported by the open source communities I have worked with so far, both on-campus and abroad. With their support behind me, I feel equipped to start learning what I need to know to resolve the next two more-difficult issues that lie ahead of me!

#Hacktoberfest 2019: documenting my first-ever Hacktoberfest contribution

In my last post, I identified three GitHub issues to kick off my participation in Hacktoberfest 2019. Today, I am happy to showcase my resolution of one of those issues, marking my first-ever Hacktoberfest contribution!

Layer5.io

Before I continue on, I want to acknowledge the project that I have contributed to. In an article discussing their participating in the Google Summer of Code 2019 program, Layer5 is described as a community which represents “the largest collection of service mesh projects and their maintainers in the world”. RedHat.com helpfully defines a service mesh as “a dedicated infrastructure layer” of an application that controls how different parts of that application (“services”) share data with one another (i.e. ‘mesh together’).


Selecting my first Hacktoberfest issue

As I mentioned my last post, I came into contact with Layer5 after discovering (through the Hacktoberfest Issue Finder) its issue regarding table filtering—and subsequently discovered an unreported styling issue:

A styling issue with a collection of lists hosted on Layer5's Landscape page.
A styling issue affected a collection of lists hosted on Layer5’s Landscape page.

Of the three GitHub issues I’ve scoped out, the resolution of this styling issue (i.e. tweaking CSS) represents the simplest of tasks that I have lined up—and an ideal candidate for a first-time Hacktoberfest contribution!

As far as I could tell, no open issues concerned the styling problem that I discovered. So, as instructed both Layer5’s website (and encouraged its extremely-welcoming development team), I opened my own issue:

https://github.com/layer5io/layer5/issues/191
Issue – Enhance landscape categories section wrapping (#191)

Identifying a solution

To address this issue, I came up with the idea of realigning the category list items horizontally, transforming the poorly-behaving columns of category ‘cards’ into rows in a responsive and easily-scalable vertical stack.

Implementating this idea proved quite simple, requiring only a few added CSS rules, which I first accomplished by tinkering with the live webpage’s styling (with the help of the Stylish browser extension):

.card .card-content li {
  float: right;
  width: 200px;
}
.card .card-content {
  border-right: unset;
  padding: 0 0 5px 0;
}
.card .card-content:not(:last-child) {
  border-bottom-width: 1px;
  border-bottom-style: dashed;
  border-bottom-color: var(--main-dark-grey);
}

The vertical stack is implemented by the rules in the first selector: list items are floated right and assigned a fixed width, which aligns them neatly. The dashed borders and padding used to separate category lists was also adjusted to accomodate the new design (pictured below):

https://github.com/layer5io/layer5/issues/191#issuecomment-537304508

The above image is one of the two mockups of the redesign that I produced for the consideration of the project’s developers. As luck would have it, Layer5 project lead Lee Calcote provided a lightning-quick response, welcoming a pull request to it!

https://github.com/layer5io/layer5/issues/191#issuecomment-537310179

Future research area: Materialize CSS

I discovered that the ‘cards’ comprising the category section are styled using Materialize CSS. I considered using this framework in my solution, but ultimately decided to opt for a simple, intuitive solution. This framework appears interesting, and would definitely merits research were this a more-involved styling task.

Implementing the solution

While using my browser’s developer tools to tinker with styling, I discovered an inline style tag that serviced the categories section. I determined that this tag would present the best place to add the styling rules that I wrote (following the coding style of a prior contributor).

Finding the location of this style tag (i.e. of the “Service Mesh Landscape” page) in the source code was a lot more trouble than I thought it would be. After paging through too many HTML documents, I gave in and used Visual Studio’s global search functionality to locate it.

Testing the solution

Although I knew that my styling worked well when loaded from a browser extension, before I could contribute code, I needed to ensure that the styling worked equally-well when loaded inline from an HTML document. Little did I know, at that time, what I would be getting myself into…

Ruby, Gems and Jekyll? rvm, bundle and make?

Picking through my ~/.bash_history file, here is the sequence of Bash shell commands that I issued (via WSL Ubuntu) in order to execute a local copy of the layer5 website (annotated for your convenience):

## Install dependency packages ##
sudo apt-get install build-essential
sudo apt-get install software-properties-common

## Install specific version of Ruby via Ruby Version Manager ## 
sudo apt-add-repository -y ppa:rael-gc/rvm
sudo apt-get update
sudo apt-get install rvm
rvm install "ruby-2.6.3" # install specific version of Ruby specified in Layer5's Gemfile
                         # (Yes, it must be that exact version.)

## Configure RubyGems ##
echo 'export GEM_HOME="$HOME/gems"' >> ~/.bashrc
echo 'export PATH="$HOME/gems/bin:$PATH"' >> ~/.bashrc
source ~/.bashrc

## Install Jekyll and dependencies ## 
gem install jekyll bundler
bundle install           # install dependencies listed in Gemfile

## Execute project! ## 
make site                # references Layer5's Makefile
                         # alias for "bundle exec jekyll serve --drafts --livereload"

Stray thoughts on documentation

Reflecting back on the process, a question has stuck with me: how much should projects hold the hands of novice contributors? Setting up the means to run make site is not included within Layer5’s CONTRIBUTING.md file. As such, for the most novice of contributors, like myself (who have never even heard of make before), setting up the prerequisite development environment presented a lengthy and piecemeal (albeit ultimately valuable) learning experience.

How much documentation is too little? Too much? How high should the bar be set for contribution? I suppose it is up to the project’s community to decide upon the answers to these questions themselves (and write documentation, accordingly).

Creating a pull request

After successfully testing and fixing the styling on my local fork, I created a pull request:

https://github.com/layer5io/layer5/pull/192
Pull request – Restyle landscape categories (#192)

…and it got merged! First Hacktoberfest contribution, completed!

Up next!

I ended my last post by stating that I have yet to gain any experience with makefiles. Well, thanks to my work on Layer5, that is no longer true: I have since used a makefile (to launch a Jekyll executable)! This experience will undoubtedly save me some time with resolving the Comcast issue I found! However, the next Hacktoberfest issue I resolve will be the first one I blogged about.

Stay tuned!

Planning for #Hacktoberfest 2019

With Hacktoberfest 2019 almost upon us, I wanted to share some insight into my own approach to preparing for this month-long open source community event (and encourage others to join me!)

“What do I want to get out of Hacktoberfest?”

I asked myself this question to start my preparations — what accomplishments do I want to end October with? After some thought, I came up with two answers:

Goal: contribute to ‘close-to-home’ projects

I have determined that I am interested in contributing to projects that personally matter to me. More specifically, I would like to contribute to projects that:

  • affect the software that I use,
  • are relevant to the Toronto open source community, or
  • are being developed by one of my peers at Seneca College

I really like the idea of being contributing to software that I use daily. I also value the connections that I have to projects being developed by my peer group as well as the greater tech scene in my city, and would like to use Hacktoberfest as an opportunity to deepen and strengthen those connections.

Goal: progressively challenge myself

On top of contributing to projects that matter to me, I have decided that I want to use Hacktoberfest as an opportunity to build up to tackling issues that are more difficult than the ones that I am currently accustomed to handling.

Many GitHub project owners open to contributions from newer members of the open source community (e.g. new Hacktober entrants) make use of GitHub’s labeling system to advertise issues that can be handled by novice programmers. These labels include “good first issue” and “hacktoberfest“.

In order to progressively challenge myself during Hacktoberfest, I plan to ensure that the latter half of the issues that I work on do not include either of the two aforementioned labels (or similar indicators).

As an alternative challenge, I like the idea of resolving an issue within a (currently-active) project that has since been abandoned by its initial assignee. Locating and identifying such issues is a challenge in and of itself, and I will have to be tread very carefully to ensure that I don’t step on anyone’s toes.

In summary

To summarize my goal setting methodology: after asking myself what I value about open source, I reframed the answers that I came up with as goals. To remain flexible, I supplied each goal with more than one way to achieve them.


H(a)unting GitHub projects and issues

In order to hunt down GitHub projects and issues worth haunting during Hacktoberfest, I have made good use of GitHub’s search tools on top of some old-fashioned brainstorming.

“Close-to-home” projects

After compiling a list of applications that I regularly make use of (mostly those that have earned a spot on my laptop’s task bar or system tray), I picked out a few apps that are (at least partially) developed as open source projects on GitHub (and which accept pull requests):


Regarding Toronto-based projects: I’ve stumbled upon a GitHub account run by the City of Toronto’s Big Data Innovation Team (BDIT) that hosts a number of active open source projects. While these projects (such as the Traffic Internal Dashboard) appear open to outside contribution some communication would be required on my part before I could assist the small and busy development team.


Regarding projects led by my peers: I am currently looking into connecting with students creating project in conjunction with Seneca’s Centre for Development of Open Technology (CDOT) and its Open Source Technology for Emerging Platform (OSTEP) project. I hope to be able to contribute toward a fellow student on their open source project during Hacktoberfest!

Building a progressive challenge

Several of the projects I’ve listed use the “good first issue” label: VS Code, Node, React and Angular. As these types of issues are highly sought after (apart from those concerning docs, it seems), securing one may prove much more difficult than actually resolving it. Regardless, I do want to try to find and secure such an issue as my first, and I’ve found a few resources that may help me do so:

Getting started

Using the above resources, coupled with GitHub’s search functionalities, I’ve found a nice ‘good first issue’, which I’ve asked to take over:

This issue involves adding filtering functionalities to database-populated tables. Although this issue was previously worked on, it has recently been relabelled, which indiates to me that it is up for grabs, and I have now also received a go-ahead from one of the project’s devs.

While investigate, I discovered a display bug, which will comprise my second Hacktoberfest issue:

As for a third, more challenging issue, I’ve found one (in a Comcast project named RestfulHttpsProxy):

I’m familiar with RESTful APIs, but have yet to gain any experience in the Go programming language (nor with dockerfiles or makefiles)! As such, resolving this issue would definitely prove a good challenge for me!

Wish me luck!

Open source: first two pull requests merged!

In my last post, I took my first steps into open-source contributions by contributing a hotfix to a fellow student’s open-source “Notepad” applet after discovering a small issue with it. Although that pull request still currently remains open, I am proud to report that, in the meanwhile, I have since successfully contributed code to two other open source projects!

my-lightweight-noteboard – bug fix

my-lightweight-noteboard by vitokhangnguyen is a newly-released open-source applet that describes itself as “a serverless note taking web app”.

When playing around with the applet, I noticed that its styling was not yet optimized for smaller screen sizes. Specifically, I noticed that, on smaller resolutions, text nodes within the header section were overlapping and conflicting with each other:

my-lightweight-noteboard: display bug on small resolutions

To handle this bug, I performed the following steps:

  1. Opened a new issue in the project’s repository.
  2. Forked, cloned and branched the project to investigate the cause.
  3. Discovered the culprit: a few restrictive custom styling rules.
  4. Committed and pushed a bugfix to my fork, referencing the issue.
  5. Created a pull request (from my fork’s dedicated branch).

My pull request was graciously accepted with a reply from the author. (On a side note: while I was fortunate enough to have a chance to showcase my requested changes to the author, in-person, I have also learned that it is important to ‘sell’ your changes to a project using proper documentation and thorough description, both in GitHub issues and pull requests. I hope to improve at this as I gain more experience.)

For more information on this my-lightweight-noteboard, check out the author’s blog post: https://khangnguyenopensource.blogspot.com/2019/09/my-lightweight-noteboard-10.html

my-note – new feature

After contributing a bug fix to my-lightweight-noteboard, I sought out a project to contribute a new, desirable feature to—and I found my-note by shmooey.

Like my-lightweight-noteboard, my-note is a newly-release open-source applet that describes itself as “a web based note taking app”. In a blog post discussing the project’s release, the author mentions a desire to add “clear” and “save” buttons to the applet. I saw this as my opportunity to contribute.

I noticed that the author already opened their own issue concerning a “clear” button, so I opened my own issue to add a “save” button. Following a methodology similar to the one I followed to contribute to my-lightweight-noteboard, I eventually created a pull request to pull my commit that added a stylized save button.

However, after creating that pull request, I realized made a mistake: I had forgotten to reference the issue in the message of the relevant commit. Here is how I handled this (and what I would change):

  1. I ran git commit --amend, which allowed me to edit the message of my local commit.
  2. I pushed* the renamed commit up to my fork (which, as I have learned, must be treated as a separate commit), adding it to my pull request.
  3. I merged my prior two commits.

(*I have since learned that it is common practice to use the --force flag to push amended commits. While I did not use that flag in this instance, I will certainly attempt to be more prudent when modifying commit history in the future.)

After reviewing my pull request, the author requested a minor change:

"Can you implement [the save functionality] as an event listener in JS instead?"
GitHub offers excellent tools to aid requests for line-specific code changes!

I was quickly able to implement and commit the requested change, and the author subsequently accepted my pull request. Overall, contributing to this project presented an excellent learning experience in and of itself!

For more information on my-note, check out the author’s blog post: https://hmcildoon.wordpress.com/2019/09/13/my-note/


Zennotate, the subject of my last blog post, has not yet been fortunate enough to receive contributions from my peers (despite in-person efforts to advertise the project) or the broader open source community. I am, however, holding out hope that others will yet take interest in this project. If you are interested in contributing to Zennotate, please feel welcome to open an issue on its GitHub page!


Reviewing two peer-made pull requests

While Zennotate awaits new contributors, I thought that I might review a few pull requests made by my peers. I picked out two specific pull requests, each of I found interesting for different reasons.

micro-note – “Issue 2 add a clear button #3

ragnarokatz did a fantastic job with this pull request!

  • They chose a strong, common name for their working branch, initial commit and pull request.
    • This naming scheme makes it immediately clear that these three elements (branch, commit, PR) all belong to the same line of development.
    • As a branch name, “issue-2-add-a-clear-button” is, in my opinion, far more useful than “issue-2”!
  • They provided their pull request with a minimal and effective description: a bulleted list of changes to-be made.
    • Each of the two commits, apparently added after the creation of the pull request, clearly and intentionally match the two bullet points of the description!
  • Nice feedback (in comment form) was provided by the repository owner, as well.
  • (On a side note: it looks like repository owner may have mistakenly closed this PR instead of approving it. However, it looks like the owner had no problem subsequently re-opening the PR and merging the changes.)

tinyNote – “Issue 2 add a clear button #3

I wanted to highlight this pull request not because of the interaction between the requestor and repository owner, but because of an interesting comment made by a third party:

A commenter documents a bug introduced by this pull request

Apart from being very well-styled (with both code blocks and inline code formatting used effectively), I found this comment by vitokhangnguyen interesting for how it effectively functions as a link in the chain of development in several ways:

  • The comment links the current pull request to a previous pull request.
  • The comment hints at the creation of a future issue (which will necessitate a further pull request, continuing the chain of development onward…)
    • (If I were to suggest one improvement: in place of using this comment to suggestion a change, I think it would have been better to either outright state their intention to open a new issue to address this suggested change. Alternatively, that issue could have been opened beforehand, and then quoted in the comment.)

Zennotate: on first open source experiences

I have finally taken my first leaps into the world of open source by both publishing my own—as well as contributing to another student’s—first open source project!


Zennotate (on GitHub) is a minimalist note-taking web applet that takes inspiration from the visual aspects of the teachings of Presentation Zen. In the backend, the project uses Filer to store and retrieve note data from the browser’s local storage. As the project makes relatively-heavy use of DOM manipulation, jQuery is used to simplify (and beautify) syntax throughout.

On the styling side of things, Bootstrap 4 and a nifty project called legitRipple.js are put to good use. Bootstrap easily enables responsiveness in the UI, making Zennotate look great on both desktop and mobile screen sizes.

legitRipple adds a unique twist to the project: the ability to spawn off rippling CSS effects across several page elements when clicked. Zennotate spawns ripples when the user clicks on any of the applet’s foreground elements (including the Save button), when the applet is (re)loaded, or when the user saves their work using the added Ctrl+S keyboard shortcut (to provide some nice feedback).

The project additionally uses a fairly zen Google Font, Didact Gothic, throughout:

Zennotate
Zennotate, a minimalist open-source note-taking applet. Check it out here.

I decided that I wanted to contribute a hotfix to a fellow student’s open-source “Notepad” applet after discovering a small issue with it. In order to make this contribution, I first had to learn how to fork a repository and make a pull request from it—two GitHub procedures that I had previously had no need to follow in the past.


While my first steps into open-source contributions were completed in the span of hours, they mark the start of a years-long journey; one that I am more than happy to dive right into.

NodeGui: cross-platform native desktop app development for the web programmer

Web developers rejoice: two industry-favorite tools can now be leveraged in the development of cross-platform native desktop applications! NodeGui and NodeGuiReact are two new open-source libraries for developing highly-performing apps using Node.js and React, respectively.

The premise is simple: both libraries build upon Qt, an open-source C++ framework for cross-platform development, allowing users to write Qt applications using JavaScript and CSS styling underpinned by Node.js (and, optionally, React). Both libraries also boast “first class TypeScript support”, opening up yet another avenue of desktop development for future-facing web devs (NodeGuiAngular when?)!

As a student that has yet to gain any experience with cross-platform desktop apps, the prospect of being able to dabble in this type of software development without having to learn any new frameworks—all while gaining further experience with popular web technologies—seems incredibly valuable!

Interested in contributing? NodeGui is being developed largely using C++ (and some TypeScript). NodeGuiReact, which exists as a React renderer for NodeGUI, is being developed using TypeScript.

For more information, check out:
The launch announcement (author’s blog)
NodeGui docs
NodeGuiReact docs

Tutorial: Regular Expressions for the Nonprogrammer

It is probably safe to assume that anyone who uses a computer will occasionally need to manipulate words within a text editor.

Fortunately, most text editors provide a wonderful tool called “find and replace”, which can often assist in these tasks. Unfortunately, when “find and replace” fails to help, we are often forced to resort to manual labour.

ProblemManual Solution
Have: “” ‘’, need: "" '' Find and replace, four times
List contains too much textTrim each list item individually
Convert words to title caseCapitalize each word individually

After making such tedious and repetitive corrections time after time, you may eventually wish to possess some way to communicate your intentions to your word processor; to make it do all of that hard work.


Several years ago, I found myself in desperate need of some sort of “bulk find and replace” utility program to solve a particular problem I had.

Problem
Repeatedly replace a long list of characters with different characters

Back then, as a nonprogrammer, I did what many others might do: search for some miracle app that could help me. Although “bulk find and replace” apps do exist, I was unable to find any (free) one that could do exactly what I required.

However, I discovered a better solution: regular expressions. Since then, I have never been forced to make repetitive edits to text ever again.


Within this blog post, you will be briefly introduced to regular expressions and learn how to use them to painlessly solve problems similar to those listed above through the use of a specific text editing software.

Regular Expressions

What is a ‘regular expression’?

For the purposes of this blog post, a regular expression is piece of code that we will use to add pattern-matching logic to a text editor’s find and replace functionalities.

For a complete definition of regular expressions, as well as regular expression documentation, you are recommended to visit regular-expressions.info, which will be referenced throughout this blog post.

How can I learn regular expressions?

The remainder of this blog post is intended to act as an overview into the use of regular expressions with a specific text editor. You may also choose to treat this blog post as a brief tutorial exercise, and follow along with the tutorial steps provided, or utilize the links at the end of the article.

If you enjoy learning through activity, you may also enjoy the interactive regular expressions tutorial at RegexOne.com.

If you prefer to learn through study, you may wish to reference the Regular Expressions Quick Start Guide.

Notepad++ RegEx Demo

Notepad++ is a free plaintext editor for Windows operation systems. It supports the use of regular expressions to enhance its find and replace operations. From this point onward, you will see Notepad++ being used to demonstrate the use of regular expressions.

Note: multiple implementations of regular expressions engines exist. Notepad++ uses “Perl-compatible regular expressions” (PCRE). To learn more about PCRE, you may wish to reference Notepad++’s own regular expression tutorial.

Setting Up Notepad++

Once you have downloaded Notepad++, launch it to open a new text document and copy in any text that you would like to reformat. For the purposes of this tutorial, we will be reformatting the following sample text:

“DO”: ‘a deer, a female deer’
“RE”: ‘a drop of golden sun’
“MI”: ‘a name I call myself’
“FA”: ‘a long, long way to run’
“SO”: ‘a needle pulling thread’
“LA”: ‘a note to follow Sew’
“TE”: ‘a drink with jam and bread’

Adapted from “Do-Re-Mi” from The Sound of Music

Once you have your text open in Notepad++, open the program’s ‘Replace’ window, which can be accessed through the ‘Search’ menu on the program’s menu bar, or through the keyboard shortcut Ctrl+H:

The "Replace" modal window of Notepad++
Notepad++’s ‘Replace’ window (Ctrl+H)

In order to enable the use of regular expressions, here, click on the ‘Regular expression’ radio button, found in the lower-lefthand corner of the Replace window. After doing so, you are now ready to add regular expressions into the “Find what” and “Replace with” fields. Let’s try this out, now.

Simple Matching and Deletion

Without regular expressions, it is possible to delete all instances of a simple text string using a find-and-replace functionality. Here’s how to do so:

  1. Enter the text string into the ‘Find’ field.
  2. Ensure that the ‘Replace’ field is empty
  3. Press the ‘Replace All’ button

Using regular expressions, we can perform smarter, more-targeted deletions using the same principle. To demonstrate, let’s delete the quotation marks from our Do-Re-Mi list opened in Notepad++.

To do so, we first add an instance of each quotation mark character into the ‘Find’ field, and then enclose those characters in square brackets (denoting a character set): [“”‘’]

Notepad++ will match any single character enclosed in square brackets. To delete those matched characters, simply follow steps 2 and 3, above.

After doing so, our list should now look like this:

DO: a deer, a female deer
RE: a drop of golden sun
MI: a name I call myself
FA: a long, long way to run
SO: a needle pulling thread
LA: a note to follow Sew
TE: a drink with jam and bread

Let’s delete the descriptions of each list item. To to do, we’ll tell Notepad++ to match the colon on each line as well all characters following it. We can do so using the following regular expression: :.+

In a regular expression, a dot (.) is a special, reserved character (metacharacter) that acts like a wildcard; it matches (almost) any single character. The plus sign is a operator that causes its operand to repeat. For example, .+ matches one or more characters, which means that :.+ matches a colon followed by one or more characters.

Capture Groups and Replacement

After deleting our list items, we’re left only the names of the musical tones, in all-caps, and still listed on separate lines:

DO
RE
MI
FA
SO
LA
TE

Let’s quickly reformat our text into a dash-separated list. We can actually do so very easily without the use of regular expressions:

  1. ‘Find what’: \r\n (Windows-specific newline escape sequence)
  2. ‘Replace with’: -
  3. Replace All

We are left with: DO-RE-MI-FA-SO-LA-TE

Our last task will be to convert the second letter of each word to lowercase. In order to do so, we will use two regular expressions. The first, (\u)\b, will be entered into the ‘Find what’ field. The second, \L\1\E, will be entered into the ‘Replace with’ field.

In the first expression, the parentheses denote a capture group, which is referenced by the backreference, \1, within the second expression. The first expression matches every uppercase letter (\u) that is followed by a word boundary (\b).

In the second expression, the backreference is enclosed by case conversion escapes, which converts it to lowercase.

After running the replacement, we have achieved our final result:
Do-Re-Mi-Fa-So-La-Te

Animation depicting all provided regular expressions being applied in sequence
The process in action

Next steps

If you are interested in learning more about regular expressions, you may wish to look into any of the following resources: